CLIs
A type-safe and interactive command line program, powered by React and Ink. We also encourage the Command Line Interface Guidelines for building better programs.
The CLI provides a simple object oriented framework for building and managing command line programs, with clear separation of commands, middleware, args, a program instance, and more. It further streamlines the development process by utilizing Ink for terminal rendering, as manually handling ANSI escape sequences and terminal widths can be tedious and complicated.
The CLI makes heavy usage of the @boost/args package, which will be continually referenced throughout this documentation. It's encouraged to read and understand it first.
Installation
- Yarn
- pnpm
- npm
yarn add @boost/cli react ink
pnpm add @boost/cli react ink
npm install @boost/cli react ink
Environment variables
BOOSTJS_CLI_THEME(string) - Name of the theme module (without@boostorboostprefixes) to load for terminal style/color changes.
Program
The entry point of the command line is commonly referred to as the binary, or script, and is managed
by the Program class. This class handles the registration of commands,
applying middleware to argv (process.argv), parsing argv into
arguments (options, flags, etc), running the found command with these argument,
outputing to the terminal, and finally cleaning up or handling failures.
Begin by importing and instantiating the Program class, while passing required and optional
ProgramOptions.
import { Program } from '@boost/cli';
import pkg from './package.json';
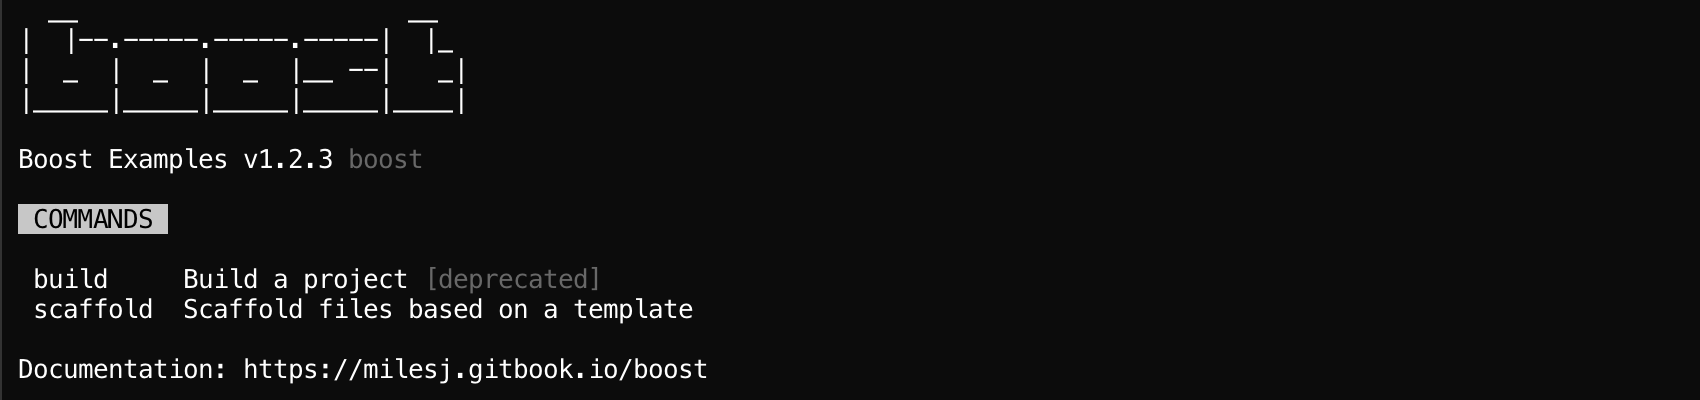
const program = new Program({
bin: 'boost',
footer: 'Documentation: https://boostlib.dev',
name: 'Boost Examples',
version: pkg.version,
});
Once commands and optional middleware have been registered, you must run
the program with Program#run() or
Program#runAndExit(), with the latter automatically passing
the exit code to process.exitCode. Both methods require an argv list to run.
program.runAndExit(process.argv);
If you have any logic that should be bootstrapped before the program runs, and you would like to inherit the error handling of the CLI, you may pass an async-aware function as a 2nd argument when running.
program.runAndExit(process.argv, async () => {
  // CLI code to bootstrap before running
  await bootstrapCli();
});
Package integration
Now that you have the basics of a program, you can set the
bin field in your package.json. This should point
to the program-aware file you have defined previously. For example, if my program will be called
boost.
{
  "bin": {
    "boost": "./bin/boost.js"
  }
}
If you're writing your program in TypeScript, or non-Node compatible JavaScript, you'll need to down-level compile before releasing your package. A simple alternative approach is to point your binary file to where the compiled program would be found.
#!/usr/bin/env node

require('../lib/program.js');
Stand-alone
Boost offers 2 implementations for how the binary can be executed, the 1st is known as a stand-alone program. This implementation only supports 1 command known as the default command, which is immediately executed when the binary is ran. It does not support sub-commands.
To create a stand-alone binary, create and instantiate a command, then pass it to
Program#default(). The command's path is ignored for this
situation.
import { Program } from '@boost/cli';
import StandAloneCommand from './commands/StandAloneCommand';

const program = new Program({
  // ...
});

program.default(new StandAloneCommand()).runAndExit(process.argv);
Some good examples of stand-alone binaries are
babel,webpack, andtsc.
Multi-command
The 2nd implementation is opposite the stand-alone program, and is known as a multi-command program. When the binary is ran, and no arguments are passed, a help menu is displayed instead of executing the default command. Otherwise, if arguments are passed, a registered command will be ran based on matching path name.
To create a multi-command binary, create and instantiate multiple commands, and pass them all to
Program#register(). In the example below, the boost binary
would support the boost install, boost uninstall, and boost build commands.
import { Program } from '@boost/cli';
import InstallCommand from './commands/InstallCommand';
import UninstallCommand from './commands/UninstallCommand';
import BuildCommand from './commands/BuildCommand';

const program = new Program({
  // ...
});

program
  .register(new InstallCommand())
  .register(new UninstallCommand())
  .register(new BuildCommand())
  .runAndExit(process.argv);
Some good examples of stand-alone binaries are
npm,yarn, anddocker.
Middleware
Boost will parse provided argv (a list of string arguments, typically from process.argv) into
args (an object of options, flags, params, etc) for easier consumption. This process can be
intercepted with Program#middleware(), which allows both argv
and args to be read and mutated.
Middleware is a function, that receives the argv list as the 1st argument, and a parse callback as the 2nd argument. It must return an args object, which can be built by executing the parse callback. This allows both before, middle, and after implementations to be possible, as demonstrated below.
import { Program, Middleware } from '@boost/cli';

const example: Middleware = (argv, parse) => {
  if (argv.includes('--help')) {
    argv.push('--all');
  }

  return parse();
};

const program = new Program({
  // ...
});

program
  // Function reference
  .middleware(example)
  // Inline async function
  .middleware(async (argv, parse) => {
    const args = await parse();

    args.options.flag = true;

    return args;
  })
  .runAndExit(process.argv);
Middleware is async, so the parse callback must be awaited! This also means you can implement your own async functionality, like file system access, or network requests.
Built-in
Boost provides the following built-in middleware for common scenarios:
checkNodeRequirement and
checkPackageOutdated.
import { checkNodeRequirement, checkPackageOutdated } from '@boost/cli';

program
  // Log a message
  .middleware(checkPackageOutdated('@boost/cli', require('@boost/cli/package.json').version))
  // Log an error
  .middleware(checkNodeRequirement('>=12.10.0'))
  // Throw an error
  .middleware(checkNodeRequirement('>=12.10.0', true));
Commands
Commands are self-encapsulated pieces of business logic that are ran when a matching path (a unique
argument) is found on the command line. To create a command, import and extend the abstract
Command class, and implement a
Command#run() method. This method can be async and even render
React components!
import { Command } from '@boost/cli';

export default class BuildCommand extends Command {
  async run() {
    this.log('Starting process...');

    await runHeavyAsyncProcess();

    this.log('Process finished!');
  }
}
However, that's not all required, as a command and it's features must be configured! Features may be defined using TypeScript decorators, static class properties, or property initializers. All formats will be demonstrated in the examples below.
Config
All commands support the metadata configuration defined in
CommandConfig, with path and description being mandatory.
When using decorators, import the Config decorator and apply it to the
Command class. The path and description are required, while all other metadata can be passed as an
object. Otherwise, just define static class properties of the same name!
- Decorators
- Initializers
- Static properties
import { Command, Config } from '@boost/cli';

@Config('build', 'Build a project', {
  aliases: ['make'],
  deprecated: true,
})
export default class BuildCommand extends Command {}
import { Command } from '@boost/cli';

export default class BuildCommand extends Command {
  static path: string = 'build';

  static aliases: string[] = ['make'];

  static description: string = 'Build a project';

  static deprecated: boolean = true;
}
import { Command } from '@boost/cli';

export default class BuildCommand extends Command {
  static path: string = 'build';

  static aliases: string[] = ['make'];

  static description: string = 'Build a project';

  static deprecated: boolean = true;
}

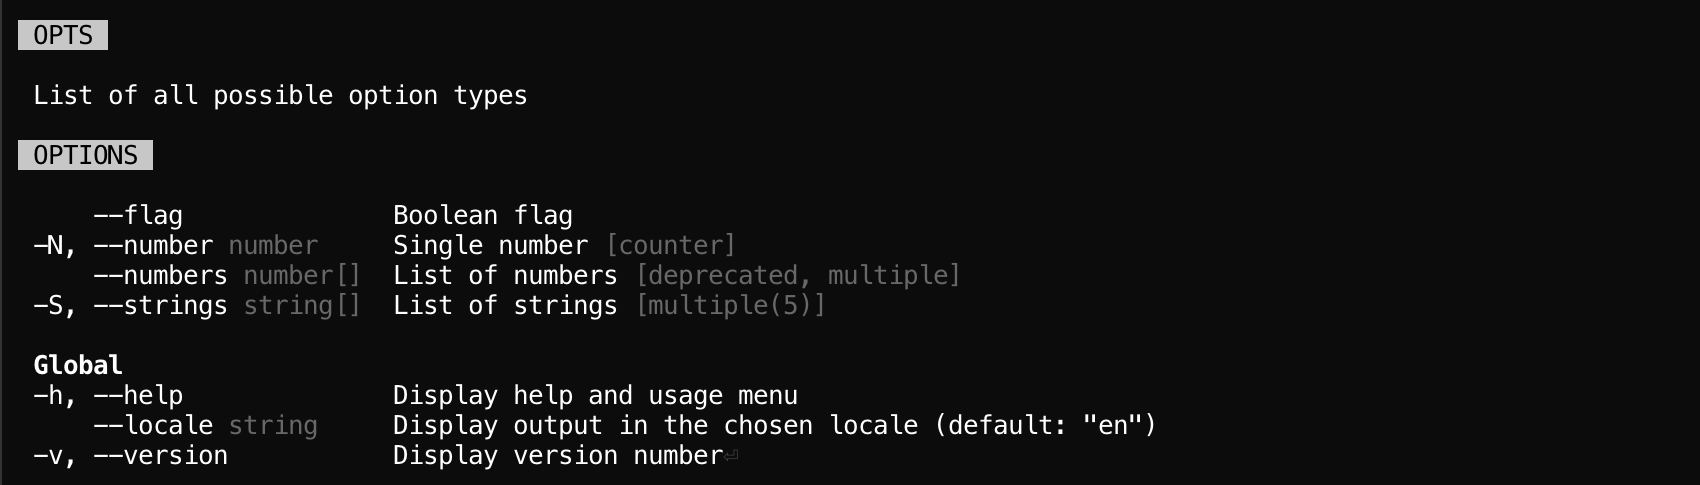
Options
Options are optional arguments that accept a value on the command line. When a
command is ran, each option is set as a class property based on the matching command line value, or
the provided default value. Like configuration above, options can be defined in many formats
(below), with option types being passed to the 1st Command generic slot.
-
Decorators: There are 5
Argdecorators (uppercased names) to choose from when defining options, all of which are defined on a class property, where the property name becomes the option name. For example, a property ofsavewould become the--saveoption. Depending on the decorator, they support many option settings, excludingtypeanddescription, which are inferred, anddefaultwhich comes from the property value. -
Initializers: There are 5
Arginitializers (lowercased names) to choose from when defining options, all of which are defined as a class property, where the property name becomes the option name. Configuration works exactly the same as decorators. -
Properties: If you prefer to use static properties, all options are defined through the single static
optionsproperty, which requires a mapping of option names to option settings. With this approach,typeanddescriptionare required, withdefaulteither being configured with a setting, or coming from the class property value. For easier type safety, theOptionscollection type can be used to type the static property.
- Decorators
- Initializers
- Properties
import { Command, Arg, GlobalOptions } from '@boost/cli';

interface CustomOptions extends GlobalOptions {
  flag: boolean;
  number: number;
  numbers: number[];
  string: string;
  strings: string[];
}

export default class CustomCommand extends Command<CustomOptions> {
  // --flag
  @Arg.Flag('Boolean flag')
  flag: boolean = false;

  // --number
  @Arg.Number('Single number', { count: true, short: 'N' })
  number: number = 0;

  // --numbers
  @Arg.Numbers('List of numbers', { deprecated: true })
  numbers: number[] = [];

  // --string
  @Arg.String('Single string', { choices: ['a', 'b', 'c'], hidden: true })
  string: string = '';

  // --strings
  @Arg.Strings('List of strings', { arity: 5, short: 'S' })
  strings: string[] = [];

  run() {
    const { flag, strings } = this;

    // ...
  }
}
import { Command, Arg, GlobalOptions } from '@boost/cli';

interface CustomOptions extends GlobalOptions {
  flag: boolean;
  number: number;
  numbers: number[];
  string: string;
  strings: string[];
}

export default class CustomCommand extends Command<CustomOptions> {
  // --flag
  flag = Arg.flag('Boolean flag');

  // --number
  number = Arg.number('Single number', { count: true, short: 'N' });

  // --numbers
  numbers = Arg.numbers('List of numbers', { deprecated: true });

  // --string
  string = Arg.string('Single string', { choices: ['a', 'b', 'c'], hidden: true });

  // --strings
  strings = Arg.strings('List of strings', { arity: 5, short: 'S' });

  run() {
    const { flag, strings } = this;

    // ...
  }
}
import { Command, GlobalOptions, Options } from '@boost/cli';

interface CustomOptions extends GlobalOptions {
  flag: boolean;
  number: number;
  numbers: number[];
  string: string;
  strings: string[];
}

export default class CustomCommand extends Command<CustomOptions> {
  static options: Options<CustomOptions> = {
    // --flag
    flag: {
      description: 'Boolean flag',
      type: 'boolean',
    },
    // --number
    number: {
      count: true,
      description: 'Single number',
      short: 'N',
      type: 'number',
    },
    // --numbers
    numbers: {
      deprecated: true,
      description: 'List of numbers',
      multiple: true,
      type: 'number',
    },
    // --string
    string: {
      choices: ['a', 'b', 'c'],
      description: 'Single string',
      hidden: true,
      type: 'string',
    },
    // --strings
    strings: {
      arity: 5,
      description: 'List of strings',
      multiple: true,
      short: 'S',
      type: 'string',
    },
  };

  flag: boolean = false;

  number: number = 0;

  numbers: number[] = [];

  string: string = '';

  strings: string[] = [];

  run() {
    const { flag, strings } = this;

    // ...
  }
}
Unknown options
By default, unknown options are not allowed and will throw an error. To allow, set the
allowUnknownOptions configuration setting to true. When enabled, all unknown options
will be set as a string object to the Command#unknown class
property.
- Decorators
- Initializers
- Properties
import { Command, GlobalOptions, Config } from '@boost/cli';

@Config('custom', 'Example', { allowUnknownOptions: true })
export default class CustomCommand extends Command<GlobalOptions> {
  run() {
    const { foo, bar } = this.unknown;
    // ...
  }
}
import { Command, GlobalOptions } from '@boost/cli';

export default class CustomCommand extends Command<GlobalOptions> {
  static path: string = 'custom';

  static description: string = 'Example';

  static allowUnknownOptions: boolean = true;

  run() {
    const { foo, bar } = this.unknown;
    // ...
  }
}

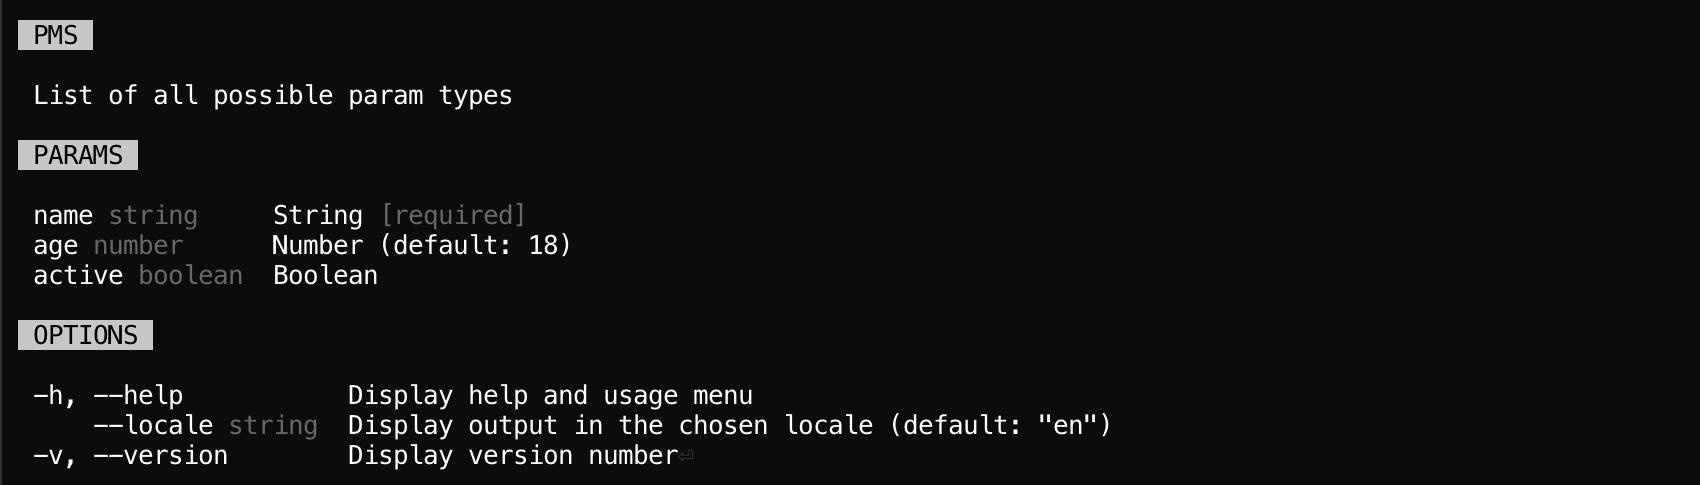
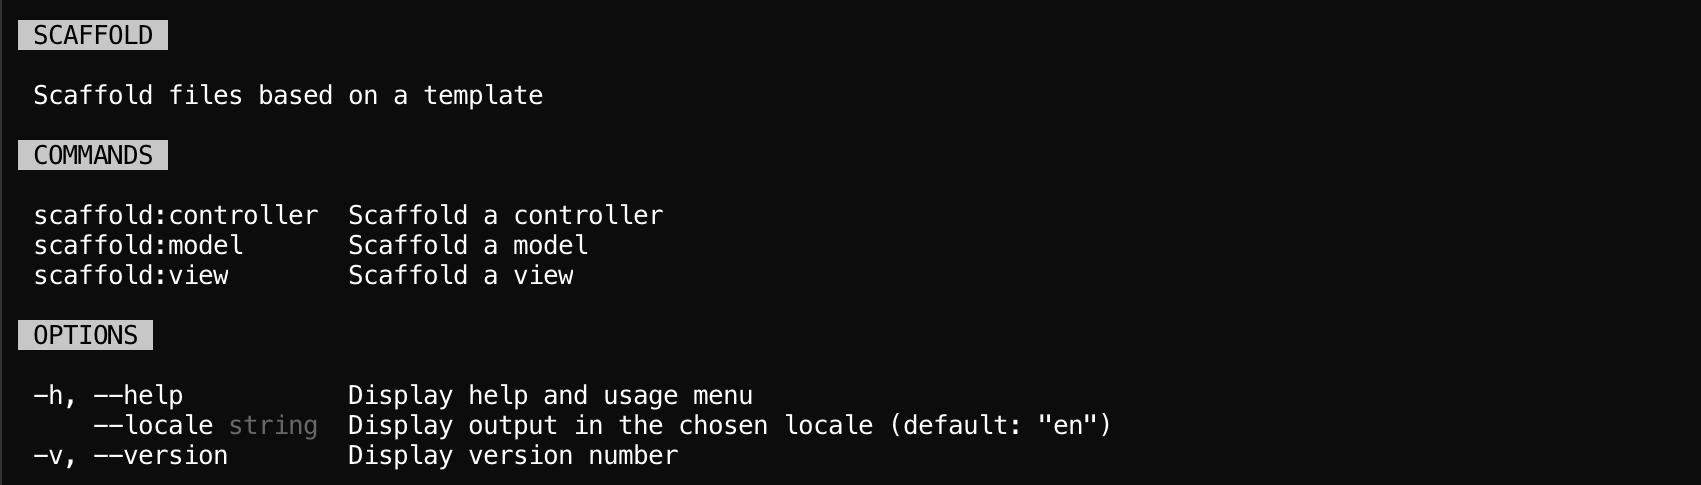
Global options
Boost provides the follow options that are always available to all commands.
--help,-h(boolean) - Displays a help menu for the chosen command or the program itself. Available under thehelpclass property.--locale(string) - Display errors, messages, and the interface in the chosen locale (if supported). Locale must be in the format of "en" or "en-US". Available under thelocaleclass property.--version,-v(boolean) - Display the current program version and exit. Available under theversionclass property.
Params
Params are command line values that will be passed to Command#run() as
arguments. When defining params, all param settings are supported, and required
are mandatory. Param types are passed to the 2nd Command generic slot.
-
Decorators: When using decorators, the
Arg.Paramsdecorator must be defined on theCommand#run()method. It accepts an argument for each param you want to configure, in the order they should be expected. -
Initializers: For initializers, the
Arg.paramsinitializer must be defined on the staticparamsproperty, which requires an array of param settings. This is mix between decorators (above) and static properties (below). -
Properties: If you prefer to use static properties, all params are defined through the single static
paramsproperty, which requires an array of param settings. For easier type safety, theParamscollection type can be used to type the static property.
- Decorators
- Initializers
- Properties
import { Command, Arg, GlobalOptions } from '@boost/cli';

type CustomParams = [string, number, boolean];

export default class CustomCommand extends Command<GlobalOptions, CustomParams> {
  @Arg.Params<CustomParams>(
    {
      description: 'String',
      label: 'name',
      required: true,
      type: 'string',
    },
    {
      default: 18,
      description: 'Number',
      label: 'age',
      type: 'number',
    },
    {
      description: 'Boolean',
      label: 'active',
      type: 'boolean',
    },
  )
  run(name: string, age: number, active: boolean) {
    // ...
  }
}
import { Arg, Command, Params, GlobalOptions } from '@boost/cli';

type CustomParams = [string, number, boolean];

export default class CustomCommand extends Command<GlobalOptions, CustomParams> {
  static params = Arg.params<CustomParams>(
    {
      description: 'String',
      label: 'name',
      required: true,
      type: 'string',
    },
    {
      default: 18,
      description: 'Number',
      label: 'age',
      type: 'number',
    },
    {
      description: 'Boolean',
      label: 'active',
      type: 'boolean',
    },
  );

  run(name: string, age: number, active: boolean) {
    // ...
  }
}
import { Command, Params, GlobalOptions } from '@boost/cli';

type CustomParams = [string, number, boolean];

export default class CustomCommand extends Command<GlobalOptions, CustomParams> {
  static params: Params<CustomParams> = [
    {
      description: 'String',
      label: 'name',
      required: true,
      type: 'string',
    },
    {
      default: 18,
      description: 'Number',
      label: 'age',
      type: 'number',
    },
    {
      description: 'Boolean',
      label: 'active',
      type: 'boolean',
    },
  ];

  run(name: string, age: number, active: boolean) {
    // ...
  }
}
Variadic params
By default, variadic params are not enabled and will throw an error when an unconfigured param is
found. To allow, set the allowVariadicParams configuration setting to true. When
enabled, all extra params will spread onto the end of the
Command#run() method as strings.
Using the example above, it would look like the following.
- Decorators
- Initializers
- Properties
import { Command, Config, Arg, GlobalOptions } from '@boost/cli';

type CustomParams = [string, number];

@Config('custom', 'Example', { allowVariadicParams: true })
export default class CustomCommand extends Command<GlobalOptions, CustomParams> {
  @Arg.Params<CustomParams>([
    // ...
  ])
  run(name: string, age: number, ...params: string[]) {
    // ...
  }
}
import { Arg, Command, GlobalOptions } from '@boost/cli';

type CustomParams = [string, number];

export default class CustomCommand extends Command<GlobalOptions, CustomParams> {
  static path: string = 'custom';

  static description: string = 'Example';

  static allowVariadicParams: boolean = true;

  static params = Arg.params<CustomParams>(/* ... */);

  run(name: string, age: number, ...params: string[]) {
    // ...
  }
}
import { Command, Params, GlobalOptions } from '@boost/cli';

type CustomParams = [string, number];

export default class CustomCommand extends Command<GlobalOptions, CustomParams> {
  static path: string = 'custom';

  static description: string = 'Example';

  static allowVariadicParams: boolean = true;

  static params: Params<CustomParams> = [
    // ...
  ];

  run(name: string, age: number, ...params: string[]) {
    // ...
  }
}

Rest args
Rest arguments are all arguments that come after a standalone --
delimiter, and can be accessed using the Command#rest property,
which is an array of strings.
Sub-commands
Of course commands can register their own commands, known as sub-commands -- it's commands all the way down! Sub-commands are configured exactly the same, with the key difference being that their path must be prefixed with their parent command's path, separated by a colon.
For example, say we have a scaffolding command, where each sub-command is the specific template to
generate. The parent path would be scaffold, where a child would be scaffold:model,
scaffond:controller, so on and so forth. You can see this in action below.
import { Command, Config } from '@boost/cli';

@Config('scaffold:controller', 'Scaffold a controller')
class ScaffoldControllerCommand extends Command {}

@Config('scaffold:model', 'Scaffold a model')
class ScaffoldModelCommand extends Command {}

@Config('scaffold', 'Scaffold a template')
class ScaffoldCommand extends Command {
  constructor() {
    super();

    this.register(new ScaffoldControllerCommand());
    this.register(new ScaffoldModelCommand());
  }
}
Sub-commands can now be executed on the command line by passing their full path, like so:
boost scaffold:model --name User.
Rendering components
This chapter assumes you have knowledge of React, JSX/TSX, and Ink. If you do not, it's highly encouraged to study those topics, but building CLIs with React is not necessarily a requirement as you can use logging instead.
With that being said, components can be rendered from a command by returning a React element from
Command#run(), or by calling the
Command#render() method. For a quick demonstration, let's
implement a component that writes to a file asynchronously.
Components and hooks provided by Boost can be imported from
@boost/cli/react!
import fs from 'fs';
import { useState, useEffect } from 'react';
import { Box, Text } from 'ink';
import { Style, useProgram } from '@boost/cli/react';

interface WriteConfigProps {
  data: object;
  path: string;
}

export default function WriteConfig({ data, path }: WriteConfigProps) {
  const { exit } = useProgram();
  const [loading, setLoading] = useState(true);

  useEffect(() => {
    fs.promises
      .writeFile(path, JSON.stringify(data), 'utf8')
      .then(() => {
        setLoading(false);
      })
      .catch((error) => {
        exit(error);
      });
  }, [path]);

  if (loading) {
    return (
      <Box>
        <Text>Writing config file...</Text>
      </Box>
    );
  }

  return (
    <Box>
      <Text>
        Wrote config to file <Style type="success">{path}</Style>
      </Text>
    </Box>
  );
}
Then we implement the command that returns and renders the component.
import { Command, Config, Arg } from '@boost/cli';
import WriteConfig from './components/WriteConfig';

@Config('config', 'Manage configuration files')
export default class ConfigCommand extends Command {
  @Arg.Params({
    description: 'Path to file',
    type: 'string',
    required: true,
  })
  async run(path: string) {
    const data = await loadConfigFromSomeSource();

    await this.render(<WriteConfig data={data} path={path} />);

    // Or...
    return <WriteConfig data={data} path={path} />;
  }
}
Using the Command#render() method allows for multiple and or
different components to be rendered within the same run cycle. Returning a component will only
use 1. However, both can be used together!
Tasks
Tasks are reusable functions that can be executed within any command, while gaining contextual and limited access to that command's instance. This promotes reusability and composition while avoiding inheritance related issues.
To use a task, create a function with any arguments and function body that you'd like. The function
body has access to the parent command's options, logger, and
rest arguments through this. If using TypeScript, the this special argument should
be typed.
import fs from 'fs';
import { TaskContext } from '@boost/cli';

// Write a JSON blob to a file defined by a --path option
export default async function writeJson(
  this: TaskContext<{ path: string }>,
  data: unknown,
  pretty: boolean = false,
) {
  await fs.promises.writeFile(
    this.path,
    pretty ? JSON.stringify(data, null, 2) : JSON.stringify(data),
    'utf8',
  );

  this.log('Wrote file to %s', this.path);
}
Now that are task is created, we can now execute it within a command using
Command#runTask(). This method requires the task as a function
reference, and all it's required arguments.
import { Command, Config, Arg } from '@boost/cli';
import writeJson from './tasks/writeJson';

@Config('init', 'Initialize project')
export default class InitCommand extends Command {
  @Arg.String('Path to config file')
  path: string;

  async run() {
    const data = await loadConfigFromSomeSource();

    await this.runTask(writeJson, data);
  }
}
Tasks are a command only feature and cannot be executed from within a React component.
Categories
Categories are a mechanism for grouping commands and options in the help menu for easier
readability. They're shared between both commands and options for interoperability purposes, and can
be defined globally with Program#categories(), or per command
through categories configuration. To make use of categories, define a mapping of keys
to category names and optional weights, like so.
program.categories({
  // Explicit weight
  cache: {
    name: 'Caching',
    weight: 60,
  },

  // Automatic weight
  error: 'Error handling',
});
- Decorators
- Initializers
- Properties
import { Command, Config } from '@boost/cli';

@Config('custom', 'Example', {
  categories: {
    cache: {
      name: 'Caching',
      weight: 60,
    },
    error: 'Error handling',
  },
})
export default class CustomCommand extends Command {
  // ...
}
import { Command, Categories } from '@boost/cli';

export default class CustomCommand extends Command {
  static path: string = 'custom';

  static description: string = 'Example';

  static categories: Categories = {
    cache: {
      name: 'Caching',
      weight: 60,
    },
    error: 'Error handling',
  };

  // ...
}
Categories are sorted by weight first, then alphabetical second, so define weight when you want
strict control of the category order. Uncategorized items have a weight of 0, and the built-in
globals have a weight of 100.
Now that categories have been defined, be sure to set the category on your commands and options
using the category setting! Here's an example using decorators.
- Decorators
- Initializers
- Properties
import { Command, Config, Arg, GlobalOptions } from '@boost/cli';

interface BuildOptions extends GlobalOptions {
  cache: boolean;
}

@Config('build', 'Build a project', { category: 'build' })
export default class BuildCommand extends Command<BuildOptions> {
  @Arg.Flag('Write output to cache', { category: 'cache' })
  cache: boolean = false;

  // ...
}
import { Arg, Command, Options, GlobalOptions } from '@boost/cli';

interface BuildOptions extends GlobalOptions {
  cache: boolean;
}

export default class BuildCommand extends Command<BuildOptions> {
  static path: string = 'build';

  static description: string = 'Build a project';

  static category: string = 'build';

  cache = Arg.flag('Write output to cache', { category: 'cache' });

  // ...
}
import { Command, Options, GlobalOptions } from '@boost/cli';

interface BuildOptions extends GlobalOptions {
  cache: boolean;
}

export default class BuildCommand extends Command<BuildOptions> {
  static path: string = 'build';

  static description: string = 'Build a project';

  static category: string = 'build';

  static options: Options<BuildOptions> = {
    cache: {
      category: 'cache',
      description: 'Write output to cache',
      type: 'boolean',
    },
  };

  cache: boolean = false;

  // ...
}
Logging
Boost integrates its very own logger so that logs can easily be sent to the configured
stdout and stderr. The logger is accessible using Command#log()
and associated methods.
import { Command } from '@boost/cli';

class CustomCommand extends Command {
  run() {
    this.log('Normal log');
    this.log.error('Failed log');
    this.log.debug('Debug log');
    // ...
  }
}
The logger is also accessible within a component by using the
useProgram() hook, like so.
import { useContext } from 'react';
import { Box } from 'ink';
import { useProgram } from '@boost/cli/react';

function CustomComponent() {
  const { log } = useProgram();

  log('Normal log');
  log.error('Failed log');
  log.debug('Debug log');
  // ...

  return <Box>Loading...</Box>;
}
It's highly encouraged to use the logger instead of the native console, so that logged messages do not interrupt the React rendering process and write to the configured streams!
Themes
Themes allow consumers to alter the color of text and backgrounds for elements rendered with the
Style component. Themes are simply npm modules that return an object of hexcodes or ANSI colors,
and can be enabled by defining the BOOSTJS_CLI_THEME environment variable.
BOOSTJS_CLI_THEME=nyan <program>
When defining a theme, we'll attempt to load from @boost/theme-<name> or boost-theme-<name>,
otherwise we throw an error. Third-party modules are currently not supported.
Performance improvements
If your program feels sluggish, or startup cost is high, or time-to-first-render lagging, please try one of the following performance improvements.
Defer React imports
To reduce startup costs, you can defer Ink, React, any React components or hooks, and any non-Boost
related imports by utilizing import() (Boost also does this internally). By using this approach,
you defer evaluation of these modules until they are needed.
The downside of this approach is that you cannot use JSX syntax. However, this only applies within commands, as standard components can import React and use JSX as normal.
import { Command } from '@boost/cli';

export default class ExampleCommand extends Command {
  async run() {
    const { createElement } = await import('react');
    const { ExampleComponent } = await import('./components/ExampleComponent');

    const data = await loadDataFromSomeSource();

    return createElement(ExampleComponent, { data });
  }
}
Test utilities
A handful of Vitest utilities are available in the @boost/cli/test module.
View the API for a full list.